F5 Python SDK Basics: Code Examples

burmese-python-shutterstock_679445704-e6878836

The Python SDK for F5 is amazing. I love using it, but the learning curve can be steep. In some situations a network engineer wants to automate some tasks, without learning the ins-and-outs of this SDK or Python in general.

F5’s documentation of the SDK is great (bookmark it), but the examples are basic and brief. If you want to get into the depths of what else can be done, refer to the iControl REST API.

This article is intended as a jumpstart if you are stuck, or a refresher if you haven’t used the F5 Python SDK in a while. The examples build off each-other, i.e. this works as a single program.


# Import the F5 module (Use pip to install> pip install f5-sdk)
from f5.bigip import ManagementRoot

# Define unique variables
user = 'f5_user'
password = 'my_f5_pass'
f5_ip = '192.168.10.5'
partition = 'Common'

# Connect to the F5
mgmt = ManagementRoot(f5_ip, user, password)
ltm = mgmt.tm.ltm

###################
## Gain information
###################

# What nodes are on this F5?
nodes = ltm.nodes.get_collection()

# Iterate
for node in nodes:
    print(node)  # Notice what gets returned, not what you expect
    print(type(node))  # Node is a 'class' type
    print(node.raw)  # Use .raw to learn what objects you can call

    # Use this as an example of the power of using these classes
    print("{} has an IP of {}".format(node.name, node.address))

# What pools are on this F5?
pools = ltm.pools.get_collection()

# We know this will be a class, so we know how to iterate through it now
for pool in pools:
    # print(pool.raw)  # If you want to learn about the objects
    print(pool.name)

# What virtual servers are on this F5?
virtuals = ltm.virtuals.get_collection()

# Getting much easier now
for virtual in virtuals:
    print("VS {} enabled? {}".format(virtual.name, virtual.enabled))


###################
## Checks
###################

# Does a node exist on the F5?
my_node = 'TESTNODE5'
test = ltm.nodes.node.exists(partition=partition, name=my_node)
print("Is {} on the F5? {}".format(my_node, test))

# Is my node in a pool?
for pool in ltm.pools.get_collection():
    # Take note of how this call works
    for member in pool.members_s.get_collection():  
        if my_node in member.name:
            print("{} is in the pool {}".format(my_node, pool.name))


###################
## Creating objects
###################

# Create a node
ltm.nodes.node.create(
    partition=partition, name=my_node, address='192.168.10.20')
# If a node of the same name exists, your progam will crash.
# Add logic you learned above to prevent this. 

# Create a pool
my_pool = 'TEST-POOL5'
ltm.pools.pool.create(name=my_pool)

# Create a member, i.e. add a node to a pool with a port
member_port = '80'
pool = ltm.pools.pool.load(name=my_pool)
pool.members_s.members.create(
    partition='Common', name=my_node + ":" + member_port)

# Create a L4 performance virtual server (most basic way)
vs_name = 'Test-Virtual-Server5'
# ltm.virtuals.virtual.create(name=vs_name, destination='192.168.100.10:80')

# We typically need a more complex virtual-server than that
# A good way is to define parameters, 
# and run them to the create function as needed
profiles = [
    {'name': 'f5-tcp-wan', "context": "clientside"},
    {'name': 'f5-tcp-lan', "context": "serverside"},
    {'name': 'http-profile-default'}
]

params = {'name': vs_name,
          'destination': '{}:{}'.format('192.168.100.10', str(80)),
          'mask': '255.255.255.255',
          'description': 'Created by Python',
          'pool': my_pool,
          'profiles': profiles,
          'partition': 'Common',
          'sourceAddressTranslation': {'type': 'automap'},
          'vlansEnabled': True,
          'vlans': ['/Common/internal']
          }

ltm.virtuals.virtual.create(**params)


###################
## Deleting objects
###################
# A few different ways to accomplish the same thing
# NOTE: Virtual servers need to be deleted before pools.
# and pools need to bedeleted before the node can.
# Use what you learned above to check membership 
# to prevent your program from crashing

# Delete a virtual-server
if ltm.virtuals.virtual.exists(partition=partition, name=vs_name):
    virtual = ltm.virtuals.virtual.load(
        partition=partition, name=vs_name)
    virtual.delete()
else:
    print("Virtual server does not exist")

# Delete a pool (we loaded it above so we can delete it this simply)
pool.delete()

# Delete a node
ltm.nodes.node.load(partition=partition, name=my_node).delete()
 

ASA Local Authentication Using Active Directory

I had a heck of a time figuring out how to set this up. Cisco’s documentation related to LDAP authentication is all over the place and there isn’t one article that describes just this. If you want to use Microsoft Active Directory to authenticate users locally logging in to the ASA and give them privileged exec access based on a Group, here are the steps.

These steps assume you are using ASDM, but I have attached the CLI equivalents as well.

Prep

  • Create a group in Active Directory that will be used to define access to the ASA. I.e. ASA Admins.
  • Create a service account (password not expiring unless you want to change it in AD and your ASA every month) that will be used by the ASA to bind with AD.
Do it

1. Log in to the ASA with ASDM (CLI steps below)

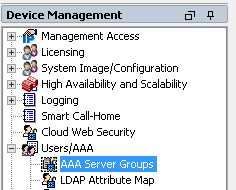
2. Go to Device Management > Users/AAA > AAA Server Groups

ad1

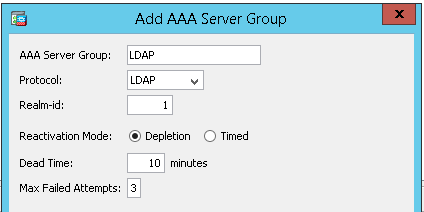
3. Add a AAA Server Group by clicking Add on the top-right

  • Enter a name for the Server Group
  • Pick LDAP as the protocol
  • Enter 1 for the Realm-id
  • Change any other settings as you see fit. The defaults will work.

ad2

4. Left-click the Server Group you just created.

ad3

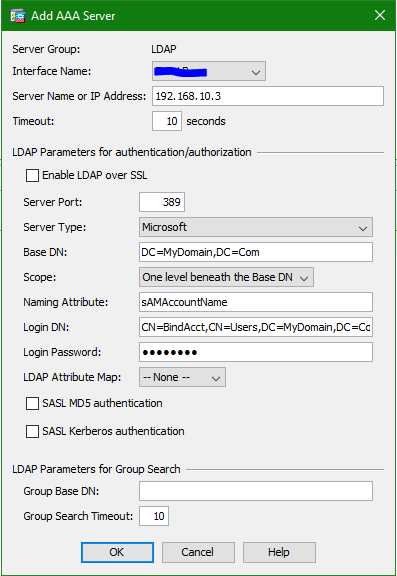
5. Click Add on the window half way down.

  • Pick the Interface that the ASA will be able to reach your DC’s through
  • Type in the IP address of your domain controller
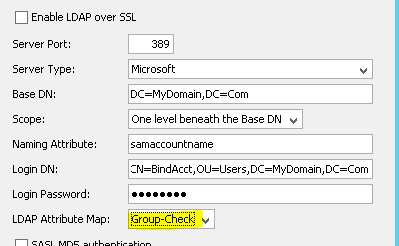
  • Pick Microsoft as the Server Type
  • The Base DN is your domain suffix, enter that in the format below
  • Depending on the hierarchy of your domain, the scope can be one level or all levels beneath the base DN is required. If you’re not sure, all levels beneath base DN works in most cases, it will just be slower in large domains.
  • The Naming Attribute should be samaccountname
  • The Login DN is the full LDAP attribute value of the service account the ASA will use to bind to LDAP.
    • Where CN is the users account name and OU/CN is the folder the account resides, i.e.: CN=BindAcct,OU=Users,DC=MyDomain,DC=Com
    • NOTE: For Microsoft, the default Users folder is designated by CN=Users, not OU=Users. If you have a separate folder where your service account is stored, it will be likely be designated by OU=Folder. Take a look at the troubleshooting info at the bottom of the article to find out for sure. .

For now the LDAP attribute map drop-box is empty. We will create that in the next step.

asaredo2

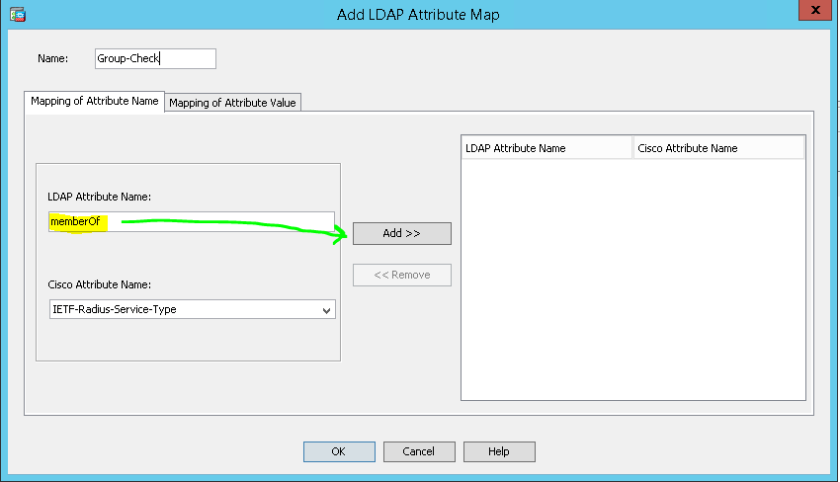
6. Expand LDAP Attribute Map and click Add. This is where the magic happens. We will designate the group we want to be admins on the ASA in this section.

  • Name the LDAP Attribute Map
  • Set the LDAP Attribute Name to memberOf
  • Pick IETF-Radius-Service-Type as the Attribute Name
  • Click Add >>

ad5

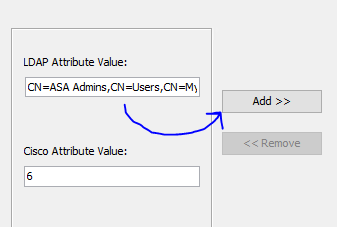
7. Click the Mapping of Attribute Value tab

  • Enter the “Group” in your LDAP directory that contains the users that you want to have administrative rights to the ASA. Typically it will be in the format below (CN=ASA Admins,CN=Users, DC=Mydomain,DC=com).
  • Set the Cisco Attribute Value to 6
  • Click Add >>

asaredo3

The entry should look like this at the end. Notice the =6 appended to the end.

asaredo4

Note on the Attribute Value:

The Cisco Attribute Value is a Radius association that we will use to map a User Group to a privilege level on the ASA. I opened a ticket with Cisco to try to decipher what these correlate to in terms of privilege values (1-15) and wasn’t able to get anything clear back.

It appears it is something unique to Radius policies that has generically been applied to LDAP/Local policies to expand the functionality of the ASA.

Cisco doesn’t have documentation that makes it clear. i.e. IETF-Radius-Service-Type 6 = ASA Privilege 15. The image below is the best I could find from Cisco. I have only had success with 1 (=1) and 6 (=15), but test different values if you have varying requirements–your results may vary.

ad7

At this point you have an LDAP attribute map. Only one can be applied to a server group at a time. So if you have multiple groups to check, enter them as additional lines in the Attribute Value Mapping section.

ad9

8. Highlight the Server group with the IP of the domain controller, and click Edit

9. For the LDAP Attribute Map, pick the Mapping you just created (Group-Check)

ad10

10. Click Apply in ASDM

CLI Equivalent

  ldap attribute-map Group-Check
    map-name memberOf IETF-Radius-Service-Type
    map-value memberOf "CN=ASA Admins,CN=Users,DC=MyDomain,DC=Com" 6
  aaa-server LDAP (MGMT) host 192.168.10.3
    ldap-base-dn DC=MyDomain,DC=Com
    ldap-login-dn CN=BindAcct,OU=Users,DC=MyDomain,DC=Com
    ldap-login-password **********
    ldap-naming-attribute samaccountname
    server-type microsoft
    ldap-attribute-map Group-Check
  exit

Make it Work

What we have done was simply to create a Server Group and a LDAP Mapping. We need to assign it to a connection type to actually use it.

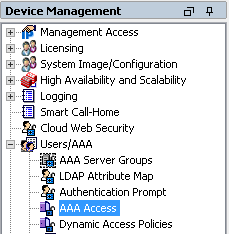
1. Go to Device Management > Users/AAA > AAA Access

ad11

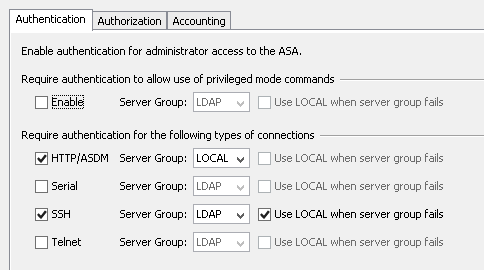
What we need to do is assign this group to a connection type. I would advise to test one type (i.e. SSH) using LDAP while retaining another (i.e. ASDM) as Local to make sure you have the LDAP properties correct and don’t lose access.

Since we are using ASDM, first enable SSH authentication with LDAP. Enabling this way will give every user in the domain access to the ASA, which we obviously don’t want, but just use this as an initial test. This is how that looks:

ad12

2. Click Apply

CLI Equivalent

aaa authentication http console LOCAL
no aaa authentication ssh console LOCAL
aaa authentication ssh console LDAP LOCAL

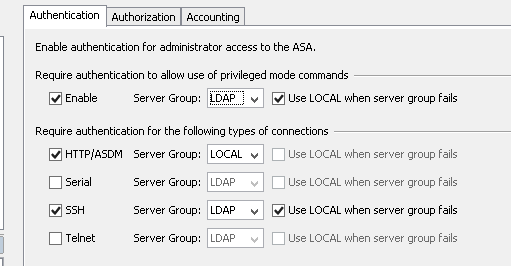
If you’re able to log-in with AD credentials, now we want to only give members of the IETF-Radius group mapping access to privileged mode. If not, check the LDAP strings (troubleshooting section on the bottom of this article), something is most likely wrong.

  1. Check the Enable box under Require authentication... and pick LDAP from the drop-down.

ad13

Note on LOCAL when group fails:

The ASA won’t warn you from the login-prompt if AD is not working (use local when group fails)—be aware that if you know the DC is down and your AD account is the same as local, enter local ASA password. It would be a good idea to have an ‘admin’ account unique to the ASA that will work when the DC’s are down.

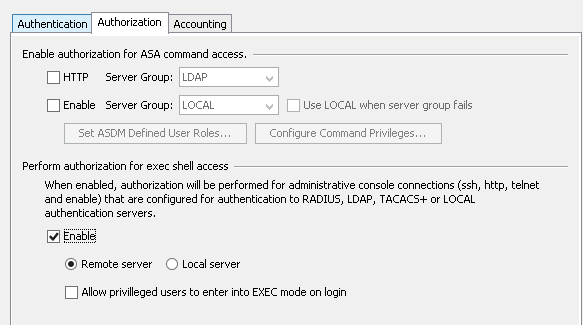
2. Secondly you have to click the Enable box under the Authorization tab for ‘Perform authorization for exec shell access‘. Optionally pick the ‘Allow privileged users to enter into EXEC mode on login‘ to be dropped into privileged exec mode on login if you have access.

ad14

CLI Equivalent:

  aaa authentication enable console LDAP LOCAL
  aaa authentication http console LOCAL
  no aaa authentication ssh console LOCAL
  aaa authentication ssh console LDAP LOCAL
  aaa authorization exec authentication-server

If you are able to login and run privileged commands ASDM connections can be applied to the LDAP authentication type.

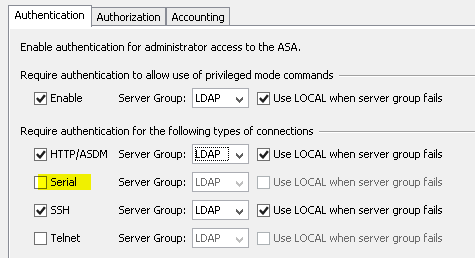
  1. Go back to the Authentication tab and change HTTP/ASDM to LDAP.
  2. If you want to protect the serial terminal you can optionally do that

ad15

Validate everything works by logging in to SSH/ASDM with a user that is in the ‘ASA Admins‘ group and one that is not.

Troubleshooting

  1. Open Active Directory Users and Computers
  2. Click View > Advanced Features to enable it
  3. Right-click any object (user, folder, OU) and click properties.
  4. Click Attribute Editor
  5. Look at the Attribute distinguishedName

This attribute is the format the ASA needs in the fields we covered above. Sometimes it will give you a hint as to something you typed wrong or wasn’t what you thought it was.

Install CA Certificate on F5 Configuration Utility (Management) Interface

CertificateChain

It seems that installing a CA signed certificate on the configuration utility (CU) is not a common practice for customers using F5 devices. I have to admit I’ve never had a need myself, until it was required by a security audit.

I followed the available articles, K42531434  contains a mixed bag of information, referencing how to configure the F5 itself as a CA and/or importing a CA cert to the CU through the command line. Not quite what I was looking for. K14620 has some more information, but again, didn’t really apply to what I needed to do.

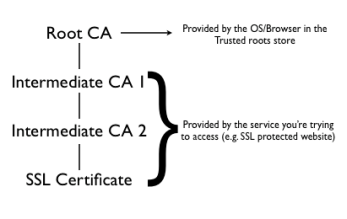
I did what seemed obvious and generated CSR, got a cert, and applied it. But the problem was the F5 CU does not send any intermediate chain certificates to the client when they connect. Depending on what your browser/OS has in its store, this can cause trust issues, which it did for me. I needed the F5 to send the intermediate certs along with the server cert.

So I opened a case with F5, after the support tech did some digging, he provided me with some information that I’ll cover below.

These steps have been tested with a device running 13.1, it may or may not be the same for 11-12.x.

Generate CSR

1. Log in to the F5 CU.

2. Go to System > Certificate Management > Device Certificate Management > Device Certificate. The default self-signed cert will be listed.

cu1.png

3. Click Renew…

cu2.PNG

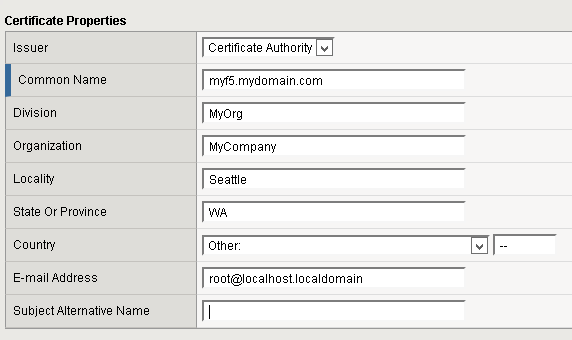
4. Change the drop-down from Self to Certificate Authority and enter the information you need.

cu3

5. Click Finished

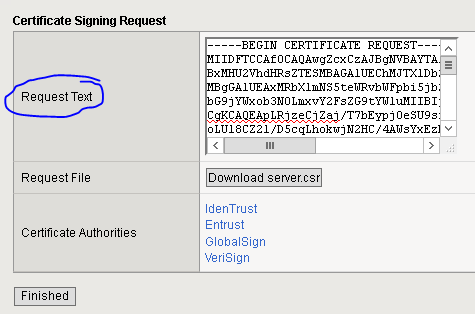
6. Copy or download the CSR to provide to your certificate authority.

cu4

7. Click Finished

Submit the CSR to the certificate authority you use. When the certificate is provided capture the server certificate and intermediate certs to use later.

Import Certificate

1. Go to System > Certificate Management > Device Certificate Management > Device Certificate

2. Click Import…

3. Paste or Upload only the server certificate provided by the CA.

cu5.PNG

4. At this point, the certificate listed under Device Certificate should be the CA server cert. Test by connecting with a browser to the CU, or openssl to the CU interface.

# openssl s_client -showcerts -connect x.x.x.x:443

Import Intermediate Certificates

This is the part that I couldn’t find documented by F5 until I opened a support case.

1. Copy the intermediate certificate(s) to your clipboard.

2. SSH to the F5 advanced shell

3. Create a new file and paste to:

/config/httpd/conf/ssl.crt/intermediate_ca.crt

4. Set security of file:

# chmod 0644 /config/httpd/conf/ssl.crt/intermediate_ca.crt

Configure the F5 to Serve the chain

1. Enter the following command:

# tmsh modify / sys httpd ssl-certchainfile /etc/httpd/conf/ssl.crt/intermediate_ca.crt

2. Restart httpd:

# bigstart restart httpd

3. Test using a browser (using a new session) or with openssl on the advanced shell:

# openssl s_client -showcerts -connect x.x.x.x:443

4. If that works, save the config.

# tmsh save sys config


Debug SSL Handshake Failures (F5, *nix)

This article primarily applies to debugging SSL handshake failures on F5 LTM, but it can be used on any device with tcpdump. 

handshake

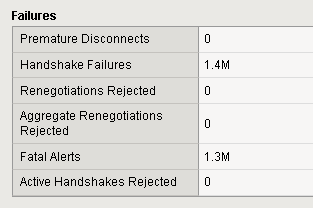
It can be tricky to truly understand who is affected when you change settings on your F5 SSL profiles. F5 has a handy little counter under the Statistics tab for your virtual-server, but it doesn’t tell you anything about who is failing.

sslshake1

They also log SSL handshake errors (01260009), but again, that doesn’t tell you who is failing.

Let’s say our security team asked us to change the F5’s ciphers, TLS or some other setting. Who did I break? Unless you have a way to talk to the customer, look at a DB for less data, etc. this can be tricky.

TCPDUMP and Wireshark can give us some insight into this, with the right capture.

The foundation for this was a response found here. However, I wanted to take a look at only the handshake failures in Wireshark to get an idea of the customer IP’s that are affected.

If I run a basic capture on the interface where SSL traffic terminates, I can see messages like this:

sslshake2

The actual content we are looking for always starts with 0x15 in hex.

sslshake3

Using the foundation article above, we can craft a tcpdump command to look for these messages.

tcpdump -ni public -C 100 -W 5 -w /var/tmp/ssl_traffic.pcap "port 443 and (tcp[((tcp[12] & 0xf0) >> 2)] = 0x15)"

This command will create 5 100MB files that will cyclically rotate and overwrite each other for you to analyze. They will mostly contain only the handshake failure messages we are looking for.

Filter Only Handshake Failure Packets

If you want to view statistics only for the ‘Handshake Failures’, take a look at the highlighted hex above. We can apply that as a filter so we only see those packets, and view the statistics on those (described below).

Use the following filter to view only the Handshake Failure packets.

frame contains 15:03:01:00:02:02:28

Now the IP’s that are failing to establish an SSL handshake can be analyzed. In Wireshark, using the Statistics tab, click Endpoints. Sort by Packets to see who the top offenders are. This can be used by others to determine if they are legit or not.

sslshake4

Bonus #1

Maybe you want to see what ciphers/protocol the client proposed before they failed to analyze further?

Well–add an or statement to our tcpdump statement, you will capture both. Expand the Client Hello in wireshark, and check what they are proposing. Perhaps that will help you to determine what ciphers you minimally need.

tcpdump -ni public -w /var/tmp/ssl_traffic.pcap "port 443 and ((tcp[((tcp[12] & 0xf0) >> 2)] = 0x15) or (tcp[((tcp[12] & 0xf0) >> 2)] = 0x16))"

Bonus #2

Phasing out TLSv1? Use this capture filter to view client hello’s that propose TLSv1. Use Wireshark’s statistics feature to determine the top clients that may be affected.

tcpdump -ni public -w /var/tmp/TLS_hits.pcap "port 443 and tcp[((tcp[12:1] & 0xf0) >> 2):4] = 0x16030100"

Automate F5 Backups

tape-bkp

I like to use Solarwinds CatTools to back up my network gear. It’s a great tool that allows you to easily schedule automated backups of network devices–or any command-line device for that matter.

This is where this post come in. There is no inherent template for backing up an F5 device using CatTools (at least right now).

I have a template that I’ve used over the years to create a UCS file based on the hostname and date, store a local copy in the event I need to restore it, as well as TFTP the file to the built-in TFTP server in CatTools for a remote backup.

CatTools Config:

First you’ll need a copy of CatTools somewhere that can reach your F5 via. SSH and have the ability to TFTP from the F5 to the CatTools server. I won’t go over the install or making sure your ACL’s allow this, but make sure you do this first.

  1. Open CatTools Manager
  2. Add your F5 devices under the Devices tab by clicking Add
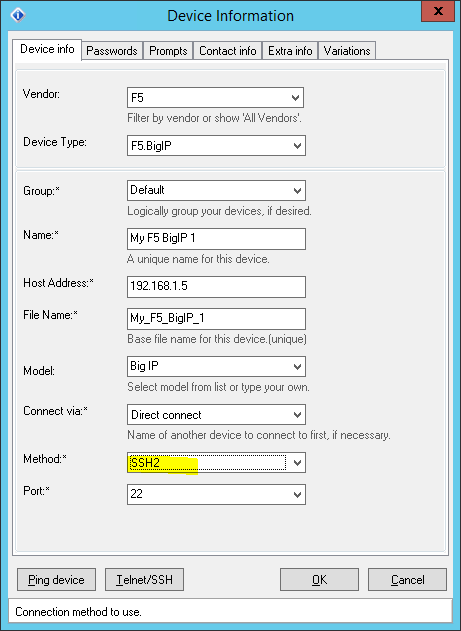
  3. Select F5 as the vendor and F5.BigIP as the device type (although I don’t think this ultimately matters for much other than reporting).
  4. Pick a name and type in a Host Address (IP address of the F5 management or self IP with ssh permitted inbound)
  5. Pick SSH2 as your method. f5bkp1
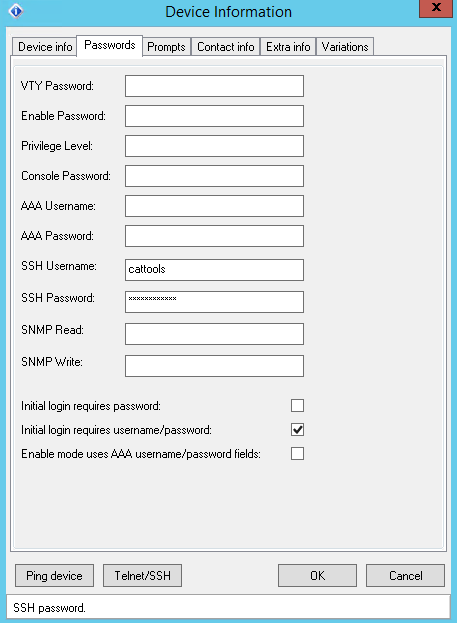
  6. Click the Passwords tab, and add a user allocated just to CatTools. It will need to be an administrator with advanced shell. f5bkp2

Now you have your device(s) ready for backup. I like to make sure I have L3/4 connectivity by testing the Telnet/SSH button to make sure a prompt comes up. If not, work on your routing/ACL’s.

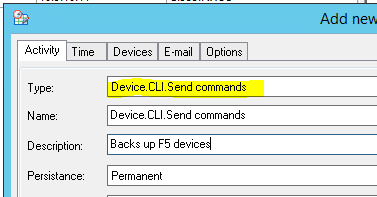
  1. Click the Add button under the Activities tab
  2. Under Activity, pick Device.CLI.Send commands option
  3. Add a description that makes sense to you. f5bkp3
  4. Click the Time tab, and set your schedule however you’d like.
  5. Under Devices, pick the F5(s) you added in the first steps.

The Script

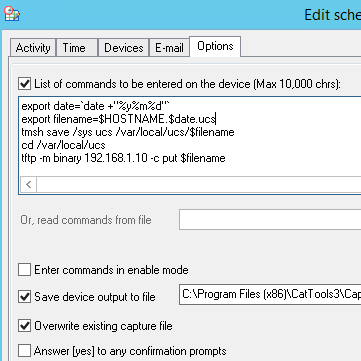
Under the Options tab is where the commands will be entered on the device. The script has several lines which I’ll describe below.

export date=`date +"%y%m%d"​`

This sets an environment variable to the current date, year, month and day for file naming. Change this depending on your location or needs.

export filename=$HOSTNAME.$date.ucs

Now we set the filename to the hostname of the F5 and the date we just defined, followed by ucs.

tmsh save /sys ucs /var/local/ucs/$filename

Now we execute the tmsh command to create and save the UCS file to the directory we want.

NOTE: Depending on how frequently you set the backup, you could fill up your F5’s local storage. Although this would take a long time, you can create a script to auto-delete the files if you want, or delete them every 6 months or so when you are in the UI.

cd /var/local/ucs
tftp -m binary 192.168.1.10 -c put $filename

Now we move to that directory, and TFTP the file to the Cattools server. Change the 192 address to your Cattools server.

This is what it will look like in the UI:

f5bkp4

Click OK and run the activity. If you did everything right there should be UCS files in your TFTP directory in CatTools. If not, check ACL’s or routing to make sure you aren’t missing anything.

Full Command List

export date=`date +”%y%m%d”`
export filename=$HOSTNAME.$date.ucs
tmsh save /sys ucs /var/local/ucs/$filename
cd /var/local/ucs
tftp -m binary 192.168.1.10 -c put $filename


F5 HTTP Response-Code Alerts

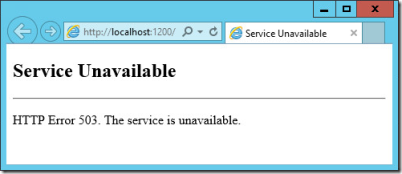
503

UPDATE: Added more logic to remove reporting anomalies from the F5 device (inaccurate response code values). The IF statement before the email pipe will cause the report to not send if the value is empty or the top server responded with less than 15% of the total response codes of that type.

I love the F5 analytics feature, specifically for HTTP. The cool thing about the feature, is that you can get a very good idea of an issue based on response code behavior.

Let’s say you have a URL that is monitored by an external HTTP tool. This tool checks the URL to make sure it gets a 200 HTTP response-code back every 60 seconds. I just got an email that the check failed, but this URL has 10 nodes behind it. How do I know which node is failing? 

Well, you can manually log into the F5 and check through the UI, use the Rest API or some other utility that ties into the F5 API.

  • Manually checking is not ideal, we want automation.
  • The Rest API is great, but why invest a ton of time getting that working, if this is our only goal?

My preference would be to add this to the Analytics Profile on the F5, so any administrator could see it and know what’s happening. Unfortunately, F5 does not alert on HTTP response-code in the Analytics Profile (as of 12.1).

Hopefully F5 does this at some point, but until then, I’m going to show you how to do this with a bash script on the F5 device itself.

Prerequisites

  1. Determine which response code do you want to check for
  2. Determine how often you want to check for potential issues
  3. Make sure you have an email server that the F5 can forward the message through.
  4. Make sure you have access to the F5 advanced shell

The Script

I’ve done most of the heavy lifting for you. I intentionally defined any part that I thought may need to be customized based on usage as variables, change them to suit your needs.

Place it wherever you want, probably somewhere under /root is best so someone could find it easily. Before you schedule the script, make sure you chmod 755 it so it can be executed (chmod 755 /root/script.sh).

#!/bin/bash

#=============================
#** Define your environment **
#** specific variables here **
#=============================

#Which response code do you want to look for?
#Add a trailing space to prevent any possible time matches 
#(the year is followed by : in the output)
code="302 "

#How many minutes in the past do you want your script to look?
#Match this up with cron
howoften="30"

#Topx determines when an email is triggered. If you are implementing this 
#in a dev environment with not much going on, you may want to limit your 
#response code trigger to when it is in the top 4 of all response codes. 
#If you are running in a prod environment, maybe top 7 is fine. 
#If you are getting too many emails, make the number lower. If you want to 
#make sure things are working, make the number higher.
topx="8"

#Email configuration
smtpserver="192.168.10.1"
sender="f5script@email.com"
receiver="me@email.com"
subject="$code Error Notification"


#-----------------------------

# Determine number of response codes in the past x minutes. 
# Typically if response codes are in the topx response-code 
# types, something we care about is happening. 

numcode=(`tmsh show analytics report view-by response-code limit ${topx} range now-${howoften}m | grep $code | awk '{print $3}'`)

# Start our logic to send alerts
# Change the number to insert more granularity than your alerting
if [[ "$numcode" -gt 11000 ]]; then
 # What is the hostname of this F5 for the email
 hostname=`uname -n`
 
 # This will break down the top culprit of the
 # queried response code into three values in an array
 # IP|PORT|CODE
 badguy=(`tmsh show analytics http report view-by pool-member drilldown { { entity response-code values { ${code} } } } limit 1 range now-${howoften}m| tail -n+8 | sed 's/:/ /;s/ | / /'`)
 
 badguysname=`nslookup ${badguy[0]} | awk -F "name = " '{print $2}' | sed '/^\s*$/d'`
 if [[ -n "$badguy" && "$((${badguy[2]}*100/$numcode))" -gt 15 ]]; then
 ( echo "${code}Response Code Report";
 echo "------------------------------";
 echo "";
 echo "Overall, there have been *$numcode*, $code messages in the past $howoften minutes for all VIPs running on $hostname.";
 echo "";
 echo "The top offender of these messages is ${badguy[0]} on port ${badguy[1]}.";
 echo "";
 echo "This server has generated $((${badguy[2]}*100/$numcode))% of the total ${code}messages in this time window.";
 echo "";
 echo "nslookup tells us the bad server is: $badguysname ";
 echo "";
 echo "Total $code : $numcode"
 echo "Node $code : ${badguy[2]}"
 echo "Bad Node : $badguysname"; ) | mailx -S smtp="$smtpserver" -r "$sender" -s "$subject" -v "$receiver" 
 fi
else
 echo "${code}response codes are not in the top $topx overall for this device. Script ended, no email sent."
fi

The email portion is a bit clunky, but with the version of software I was running, I wasn’t able to send an HTML email. If you figure that out, or want to edit the email content, go for it.

Scheduling the Script

Now we need to schedule the script. Use crontab -e to schedule your script. Read this article from F5 for some tips if you need more info. Make sure you match up the timing of your cron task with the script defined time window.

Make sure you document that you have done this!! If you leave your job and a new administrator comes in, they would have to do some digging to figure out what you have done.

I would recommend testing this by setting your response code to 200, if you get emails based on the schedule you set, change to what you want to look for.

Debugging ARP on Cisco ASA

broadcast

The packet capture wizard in ASDM is a great feature of the ASA platform. It allows a network administrator to easily debug an issue and export the capture right to Wireshark from the wizard.

However, as you use this you may notice something. Where are the arp packets? Any time Wireshark is ran from a layer-2 network, arp packets will inevitably be captured. Something I didn’t know is that the ASDM wizard does not capture broadcast packets (at least at the time this was written ASA version 9.4(2) and ASDM 7.6).

Unfortunately Cisco doesn’t really describe this in any of their capture documentation, so if you don’t typically capture through the command line, you’ll never see broadcasts and may wonder what’s wrong.

How can I capture arp broadcasts on my ASA for troubleshooting layer-2 issues?

You have to do this through the ASA command line.

  1. Log in to the ASA you want to capture/see ARP packets.
  2. Use the ‘capture’ command with the ethernet-type arp

An example would be:

ASA# capture arp-cap ethernet-type arp interface inside

Where arp-cap is the name of your capture, the ethernet-type filters the capture to only arp packets and the interface picks the interface where you want to see the broadcasts.

You can define a ‘buffer‘ flag if you want, but don’t worry about overloading your ASA, the default is 512kb. The above command is typically what you want.

Now we can execute a show command to see the capture buffer:

ASA# sh cap arp

81 packets captured

1: 13:21:17.283554 arp who-has 192.168.10.1 (cc:3:ca:f8:34:50) tell 192.168.10.21
 2: 13:21:17.283630 arp reply 192.168.10.1 is-at cc:3:ca:f8:34:50
 3: 13:21:18.600005 arp who-has 10.4.49.190 tell 192.168.10.1
 4: 13:21:20.053692 arp who-has 192.168.10.1 (cc:3:ca:f8:34:50) tell 192.168.10.167
 5: 13:21:20.053784 arp reply 192.168.10.1 is-at cc:3:ca:f8:34:50
 6: 13:21:21.069271 arp who-has 10.4.49.182 tell 10.4.48.25
 7: 13:21:21.998391 arp who-has 10.4.49.182 tell 10.4.48.25

We now  see who is broadcasting for what, and which hardware address they reside on. Use the detail flag to see more information.

Clean Up

We’ve got what we need, so its time to clean up. It’s very simple:

ASA# no cap arp-cap

F5 Local Authentication using Active Directory or LDAP

password-wide

The following instructions will cover how to deploy Active Directory or LDAP authentication with the primary goal of logging in to the F5 device with LDAP credentials..

F5 provides a few key articles that build the basis for this summary. Found here, here and here.

Key Information

Local users with the same name as an AD user cannot authenticate with local password once Remote AD authentication is enabled. However, local rights overrule ‘External Users’ configuration.

Example: I have user bsmith local and in AD. bsmith is an admin locally, but ‘External Users‘ is configured as operator only.

Once bsmith authenticates, he will be an administrator on the box.

The built-in ‘admin‘ account is the only local account that will be able to authenticate if AD is down. Make sure you have the password documented.

Prerequisites

  • Name & IP address of LDAP/AD server(s)
  • Distinguished Name of domain
  • Service account for binding to LDAP to monitor servers
  • Optional: Two LDAP/AD servers for HA configuration

Testing

Before starting it’s important to test from the command-line of the F5 to validate network accessibility and the LDAP search string.

What is my distinguished name?

If you’re using Microsoft Active Directory, follow these steps (make sure Advanced Features is on):

1. Open Active Directory Users and Computers

2. Right click the domain name at the top of the tree and click Properties

3. Under attributes you will see ‘distinguishedName‘ the value is important for the rest of these instructions. Capture it.

Pick a test user

A user will be needed to validate during some of our testing. Pick whatever user you’d like, but take note of what OU the user is in. If you are using Microsoft AD it may be in the Users OU.

Build Search String

Merge the information from the DN and user OU to build search string for testing. Here is an example:

Domain: mydomain.com

User OU: users

User: myuser

Execute Test

ldapsearch is the utility used by the F5 for testing. Follow these steps to validate layer-3/4 connectivity and LDAP functionality.

1. SSH to the BigIP

2. Use the following format to test a LDAP query using ldapsearch:

ldapsearch -xLLL -H 'ldap://mydc.domain.com' -b "cn=users,dc=mydomain,dc=com" 
-D mydomain\\domain-user -w 'userspassword' '(samaccountname=myuser)'

Use ‘ldapsearch –help‘ to get more information about the flags.

3. Using the previous query should return a bunch of information about your user. If not, something is wrong with the syntax. Try different variations until you get it working.

If content is returned, we know that the F5 can reach our LDAP server (if it cannot, check that a self-IP exists on the same subnet as the LDAP server or a route exists) and that our DN string is correct for future configuration.

Create LDAP Monitor

A monitor is needed to probe the pool that will be created in the next step. The string created earlier can be used here.

1. Log in to the F5 UI

2. Click Local Traffic > Monitors > Create…

3. Enter a name, i.e. ldap-monitor

4. Under type select LDAP

5. Create an interval that makes sense to you, the defaults are usually fine

6. Under ‘User Name‘ put the user you created in the prerequisites. Ideally it is a service account with no interactive rights, simply used to bind to LDAP.

Important!! If you use a prefix to log on to your domain, i.e. domain\user  you must enter either domain\\user WITH TWO SLASHES or myuser@domain. I’ve had the best luck with the domain\\user format.

7. In the Base field, enter the OU we want to check (bind to).

It can be anything you’d like, but basically we are making sure the LDAP server serves up a response to our LDAP request.

I simply used the cn=users,dc=mydomain,dc=com

8. Under Filter enter the object you want to check. I used cn=Domain Guests since it is a built-in object and it is not used (if I probed Domain Admins the listing could potentially be intercepted and used for nefarious purposes).

9. If your server supports SSL/TLS optionally select one under the Security field.

10. Click Finished

Create LDAP Virtual-Server

This can be done on the local BigIP or a remote device that is accessible by the device LDAP authentication is being implemented.

The purpose of this is so that if an LDAP server fails, the F5 can continue authentication. Without this configuration the F5 must rely on a single server for authentication.

1. Log in to the F5 UI

2. Click Local Traffic > Virtual Servers > Create…

3. Enter any name, IP address (ideally on the same subnet as LDAP servers), Service port is 389

4. Protocol is TCP, with TCP profile

5. Add a Default Pool as a resource with the two domain-controllers in your environment on port 389.

6. Assign the monitor created in the previous step to this pool.

7. Click Finished

8. Create a DNS record for this virtual-server local to your environment, i.e. ldapvip.domain.com

Configure LDAP Authentication

Finally!!

Important Tip: Make sure you have an SSH and browser session already open to your device in-case you get locked out. The default local admin user will always be a fallback in the case this happens, make sure you have those credentials handy.

1. Click System > Users > Authentication > Change

2. Under User Directory select “Remote – Active Directory” or “Remote – LDAP” (I have not experienced any functional difference between these in practice).

3. Host is the DNS record we created in step 8 above. If you skipped the HA portion, just enter the A record for your LDAP server.

4. Remote Directory Tree: This is the OU or starting point for your user container.

Above we used cn=users,dc=domain,dc=com. Also, dc=domain,dc=com could be used, but why return all that content when the Users are only in one or a few OU’s?

If yours are in an OU under that, use the format cn=F5users,cn=users,dc=domain,dc=com

Most cases will be cn=users,dc=domain,dc=com

5. Scope: This determines the level of your search.

Important Tip: I’ve never gotten Base or One to work, only Sub.

6. Bind: Even though this is blue, inferring that it is mandatory, it is not. If you created a service account (we did for our monitor) and you only want this user to be used to bind, then go ahead and enter that user here.

Important Tip: Remember how in the monitor configuration we had to use double slashes? I.e. domain\user. For some reason the same does not apply here. Use only ONE slash. i.e. domain\user

I left the Bind fields empty and used the User Template setting. If a user can’t bind to begin with, why search for that user?

7. Under User template %s@domain.com will attempt to use the user authenticating to bind (the F5 inserts the username typed in the User field for the %s), if they can’t bind (non-existent user) they won’t be looked up.

8. I’m not really sure what ‘Check Member Attribute in Group‘ does functionally (doesn’t Remote Role Groups cover this?), F5’s documentation is lacking here. I leave it unchecked.

9. Under Login LDAP Attribute enter samaccountname

10. In the External Users section assign the Role you’d like for authenticated AD users. Remember that if a local user matches remote, local rights supersede this configuration. Operator is a good choice if this is designed for sys-admins to do what they need.

11. Click Finished

Test logging in from a different browser session!! If all went well, logging in will work. If not something is wrong/missing. Look over the steps above again and make sure nothing was missed.

If not, troubleshoot using tcpdump

Troubleshooting

tcpdump is your best friend for figuring out what’s going on. Luckily LDAP is clear-text so deciphering syntax issues is fairly simple. F5 also has an article covering how to troubleshoot LDAP issues

1. SSH to the F5 performing the LDAP queries.

2. Use the following syntax to run a simple capture

tcpdump -s0 -ni 0.0:nnn -w /shared/tmp/ldapdebug.pcap 'host 10.1.1.1 or host 10.1.1.2'

Replace the 10.x addresses with the IP’s of your LDAP servers.

3. Attempt a login from a browser.

4. Once it fails, stop the capture with ctrl-c

5. SCP the capture off the F5 (will be in the /shared/tmp directory)

6. Examine with Wireshark.

Look for syntax errors after “searchRequest” or “bindRequest” queries. The “bindResponse”, “searchResEntry” or “searchResDone” response will be a good indicator of the problem.

My F5 Needs HSTS!!

There are plenty of written resources out there about HSTS (HTTP Strict Transport Security). I don’t intend to explain or elaborate on what it is or why you want it. The IETF RFC is a good place to start.

F5 actually has a nice article with an iRule example of HSTS enforcement. HSTS pairs nicely with OCSP Stapling, check my previous article on how to do that on an F5.

However, in my environment we have servers internal to our network that call the same virtual-server as external customers that may send calls using HTTP and HTTPS. We network engineers never really know what developers do or plan on doing, but we don’t want to break anything on them now or in the future.

I’ve added a simple filter so that if calls from the 10.0.0.0/8 network come in to the virtual-server, just pass it on–otherwise, attach the HSTS header. This is optional, so tweak this to apply to your environment. If you don’t care about internal calls, remove the if statement. Once it’s in place, apply to your virtual-server and enjoy!!

NOTE:

As of version 12.0, HSTS can be enabled through an HTTP profile. If your objective is to simply enable HSTS, this is probably the easiest and most efficient way to achieve that goal.

UPDATE:

Initially I had RULE_INIT with “1 year” as the clock time determinant. This is good for performance reasons, because the event is only triggered once. Below is from F5’s iRule wiki showing when RULE_INIT is triggered:

hsts0

I noticed this on my iRule statistics page of my iRule, showing that the time that the iRule was saved, was the set time the max-age will be compared against.

hsts1

The problem with this is that over time, your HSTS max-age will slowly shorten unless your F5 is rebooted or the iRule is modified. This is not ideal, since we want this rule to be evergreen.

So, we have a couple options; change RULE_INIT to CLIENT_ACCEPTED or set your clock scan very far into the future to protect yourself. The HSTS draft doesn’t specify that having a very long max-age is not recommended, so at this point if you want to minimize CPU load on your F5, go that route. CLIENT_ACCEPTED will have a performance impact (likely nominal), but you know that your max-age will always be a set period of time, i.e. one year and you’ll never have to come back to this iRule.

CLIENT_ACCEPTED:

when CLIENT_ACCEPTED {
 set static::expires [clock scan "1 year"]
}
when HTTP_RESPONSE {
 if { [IP::client_addr] starts_with 10. } {
 }
 else {
   HTTP::header insert Strict-Transport-Security "max-age=[expr {$static::expires
   - [clock seconds]}]; includeSubDomains"
 }
}

Static Age:

when RULE_INIT {
  set static::expires [clock scan 20900101]
}
when HTTP_RESPONSE {
  if { [IP::client_addr] starts_with 10. } {
}
else {
  HTTP::header insert Strict-Transport-Security "max-age=[expr {$static::expires 
  - [clock seconds]}]; includeSubDomains"
 }
}

Configure OCSP Stapling – F5 LTM

The documentation that F5 provides for configuring OCSP stapling is pretty sparse. I decided to write up this quick tutorial to supplement their documentation. What is presented below worked for me in my environment, but may not work in all.

Configure a DNS Resolver

  1. Click Network > DNS Resolvers
  2. Click Create… on the right side
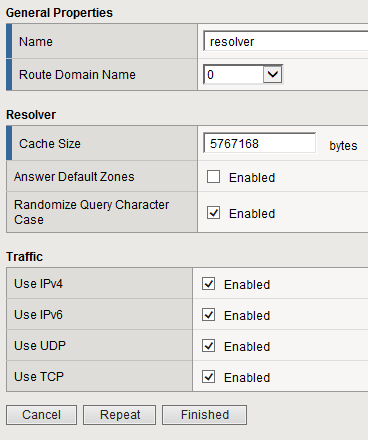
  3. Name it whatever you wish, I called mine resolver.
  4. Leave the rest of the settings as the default.ocsp1
  5. Click Finished

Configure Forward Zones

  1. Once your resolver is created, click its name from the Resolver List page.
  2. Click Forward Zones on the top tab area
  3. Click Add…
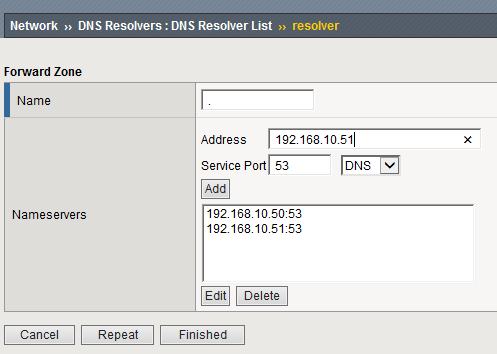
  4. In the name area put a period “.”
  5. Place the DNS servers that your F5 will use for lookupsocsp2
  6. Click Finished

Import Certificate Chain

Depending on where the certificate was purchased used by your virtual-server, a chain must be created that matches the server-certificate.

Collect the intermediate certificate(s) related to your certificate from the CA. This will contain the URL the F5 will use to validate the certificate using OCSP.

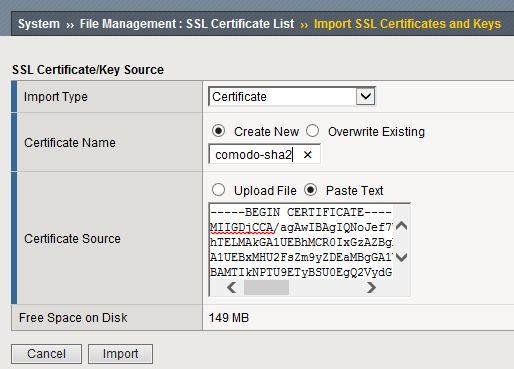
  1. Click File Management > SSL Certificate List
  2. Click Import…
  3. I like to take the chain and paste it in as text, but you can import the chain however you like.ocsp3
  4. Click Import

Create OCSP Profile

  1. Click Profiles > SSL > OCSP Stapling
  2. Click Add…
  3. Click the Advanced drop-down
  4. Pick a name that makes sense to you
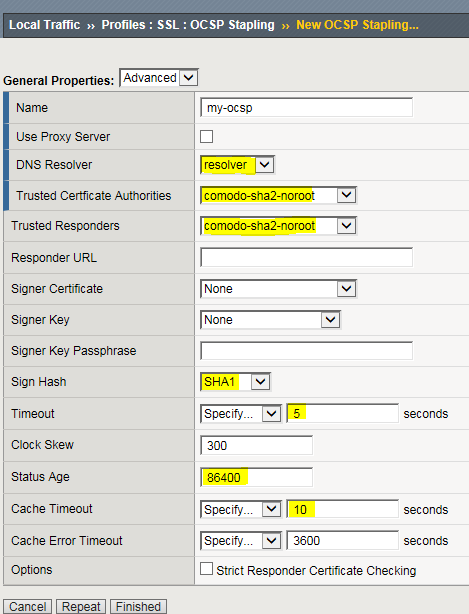
  5. In the DNS Resolver section pick the resolver we made above
  6. Under Trusted CA and Trusted Responders pick the chain we created above
  7. I use Comodo certificates, so the settings beginning at Sign Hash and below that are highlighted in yellow were changed to match Comodo’s and F5’s recommendations. These may or may not work for you.

NOTICE!! When I wrote this article (and currently), the F5 article infers to set ‘Status Age’ to 86400 as the image below reflects. After upgrading to 13.x, OCSP stapling broke in my environment. A case with F5 determined that this should be set to zero. In summary:


“Status Age specifies the maximum allowed lag time that the BIG-IP system accepts for the ‘thisUpdate’ time in the OCSP response. If this maximum is exceeded, the response is dropped. If this value is set to 0 (zero), this validation is skipped. The default value is 0 seconds. In a nutshell, this means that the BIG-IP will silently discard a response *that carries a nextUpdate time* when thisUpdate is more than or has exceeded status-age seconds in the past.”


ocsp4

Create SSL Profile with OCSP Responder

  1. Go to Local Traffic > Profiles > SSL > Client
  2. Click Create…
  3. Name it whatever makes sense to you
  4. Pick the Certificate, Key and Chain that you have imported already.
  5. In the OCSP Stapling Parameters pick the profile we created in the previous step
  6. Click Add for each certificate the profile will provide.
    • Optional – To create a more secure profile:
      1. Change your Ciphers to; ECDHE+AES-GCM:ECDHE+AES
      2. Disable Renegotiation
    • Click Finished

Testing

There are a few ways to test your profile to see whether OCSP responses are being sent from your virtual-server or not. I prefer to run a capture but you can check using the tool at SSL-labs also.

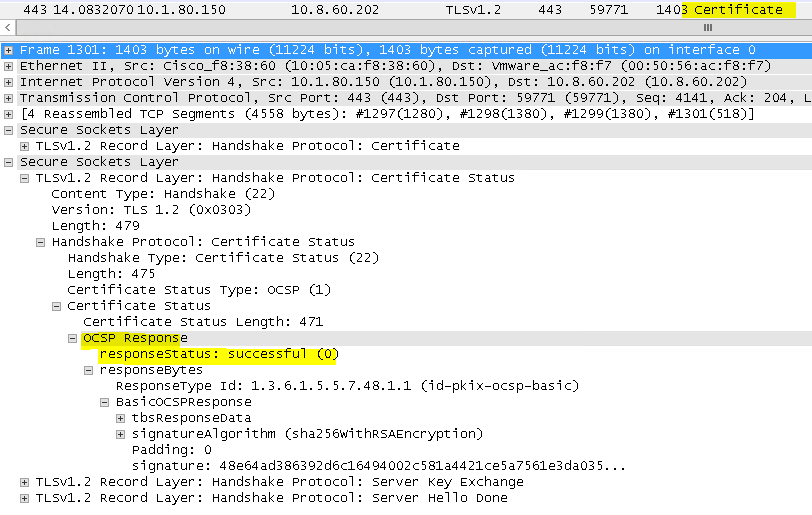
  1. Capture a SSL handshake between you and the virtual server
    • Go to the packet where the vs responds with the Certificate
    • Drill down to the Certificate Status Record Layer
    • Expand until you see OCSP response with a responseStatus of Successful (0)ocsp5
  2. Run a test using SSL-Labs
    • Go to https://www.ssllabs.com/ssltest/analyze.html and enter your domain if it is pubic
    • Wait for the test to complete and check for the OCSP Stapling line and make sure it says Yesocsp6
    • I like this site to check for potential issues with your configuration, save it and use it in the future if you don’t already.

Important Note about Default Route

Initially I had an issue with lookups and the OCSP status check using the OCSP Resolver profile I configured. I use Auto-Last Hop on our F5, so my configuration has no default route.

When you have no default route, the default behavior of the F5 is to perform DNS lookups and pull the OCSP status from the virtual-server(s) VLAN self-IP with the OCSP profile assigned to it. If you are firewalling and don’t have a rule permitting this, you may see that OCSP is not working.

As of this version (11.6.0 HF5), the F5 will not use the MGMT interface which typically has its own IP with a gateway. You must have a self-IP assigned elsewhere and configure a default route for it.

There are a few solutions to this:

  • Add a default route for an interface you want to perform lookups (syslog, snmp interface, etc.) and allow that IP to perform DNS lookups and pull the OCSP status from the Internet. The self IP(s) of the F5 on this VLAN must have Internet access.
  • Add ACL’s to allow each virtual-servers VLAN self-IP to perform DNS lookups and pull the OCSP status. These IPs will all require Internet access.
  • Change the OCSP profile to use proxy to perform lookups and pull status.